Simple Tips for Keeping Kids’ Art Organized
Children’s artwork captures their creativity, growth, and everyday experiences. A single drawing can be a treasured memory, but a steady stream of paintings, school projects, and paper crafts can quickly fill tables, shelves, and closets.
The goal is not to keep every piece. Instead, create a simple system that makes it easy to enjoy favorite works, save meaningful memories, and let go of items that no longer need to be stored. With a few practical habits, kids’ art can stay organized without becoming another daily chore.
Create a Dedicated Art Collection Spot
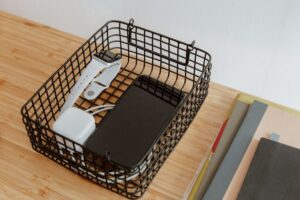
Start by choosing one place for new artwork. This could be a basket, magazine holder, file box, or drawer near the entryway or homework area. The container does not need to be large. A limited space encourages regular sorting.
Label the spot clearly with a name such as “Artwork to Sort” or “New Creations.” When your child brings home a project, place it there instead of putting it on random surfaces around the house.
A dedicated collection spot helps in three ways:
– It keeps artwork from spreading into every room.
– It makes new pieces easy to find.
– It creates a natural reminder to sort through the collection.
Choose a container that your child can reach. When children can place their own artwork in the designated area, organization becomes a shared habit rather than an adult-only task.
Set Up a Simple Sorting Routine
Artwork is easier to manage when you sort it regularly. Choose a schedule that fits your family, such as once a week or once a month. A short, consistent routine is usually more effective than waiting until the collection becomes overwhelming.
Use a few basic categories:
– Keep and display
– Keep and store
– Photograph or scan
– Recycle or repurpose
– Decide later
The “decide later” category is useful when you are unsure about a piece. Place those items in a small folder or envelope and review them again after a few weeks. This avoids making rushed choices while keeping the main collection under control.
Try to involve your child in the process. Ask what they like about each piece and which works they would like to display. This gives them a voice and helps them learn that organizing does not mean their creativity is being dismissed.
Display a Rotating Selection
Displaying every piece at once can make a room feel crowded, and favorite artwork may get overlooked. Instead, create a rotating display area.
You could use:
– Clipboards mounted on a wall
– A string with clothespins
– Magnetic frames
– A corkboard
– An open shelf
– A simple gallery wall
Choose a set number of spaces, such as five or six. When the display is full, your child can choose which piece should be replaced. The older work can then move to a storage folder, digital archive, or recycling pile.
A rotating display gives children a sense of pride while keeping the system manageable. It also turns changing artwork into a small family tradition. Consider taking a photo of each display before replacing it so you can remember the collection over time.
Use Folders for Flat Artwork
Flat artwork is usually easiest to store in large folders or portfolios. Choose one folder per child, school year, or age range. Oversized projects may need an art portfolio, accordion file, or wide storage box.
Add a simple label to each folder, including:
– Child’s name
– Date range
– School year or age
– Optional theme, such as preschool or summer art
Avoid filling folders too tightly. Overstuffed folders can bend paper, tear pages, and make it difficult to look through the collection. If a folder becomes full, sort it again and keep only the pieces that are most meaningful.
For small drawings, activity sheets, and notes, use clear plastic sleeves or file pockets. These protect fragile pieces and keep similar items together without requiring complicated supplies.
Protect Three Dimensional Projects
Paper is easy to file, but children also create sculptures, collages, mobiles, and other three dimensional projects. For these items, choose storage that protects their shape.
Useful options include:
– Lidded plastic bins
– Sturdy cardboard boxes
– Clear containers
– Shelves with labeled baskets
– Reusable gift boxes
Wrap delicate projects loosely in tissue paper or plain packing paper. Avoid stacking heavy objects on top of them. If an item is too large or fragile to store easily, take detailed photos before deciding whether to keep the original.
When storing seasonal pieces, place them with related decorations. For example, winter crafts can go with holiday storage, while summer projects can be stored with outdoor activity supplies.
Create a Digital Backup
Photos and scans can preserve artwork without taking up much physical space. Use natural light and place the artwork on a flat surface. Take the photo from directly above when possible, and make sure the entire piece is visible.
Create digital folders by child and year. You might use a structure such as:
– Emma
– 2026
– 2027
– Noah
– 2026
– 2027
Add the date or a short description to each file name. For example, use “June 2026 rainbow painting” instead of a general name such as “artwork.”
Digital copies are especially helpful for large paintings, temporary projects, and artwork with a short lifespan. You can also create a yearly photo book or slideshow that gives your child a lasting record of their creative work.
Give Artwork a Second Life
Not every piece needs to be stored forever. Some artwork can become useful or decorative items around the house.
Try using children’s art to make:
– Greeting cards
– Gift tags
– Bookmarks
– Collage paper
– Homemade wrapping paper
– Thank-you notes
– Decorations for a child’s room
Cutting up artwork can feel difficult, so ask your child first. They may enjoy choosing which pieces become cards or collages. This approach also teaches that creative work can be reused in new ways.
Make Letting Go Easier
Sorting artwork can bring up strong feelings for both parents and children. Avoid presenting recycling as a judgment about the quality of a piece. Explain that your home has limited storage space and that choosing favorites helps give special work more attention.
You can say:
– “Which pieces would you like to remember?”
– “Should we display this one or save it in your folder?”
– “Would you like to turn this into a card?”
– “Can we take a picture before we let it go?”
Celebrate the act of creating, not just the finished result. A quick photo, a short note, or a conversation about the project can preserve the memory even when the physical item is recycled.
Keep the System Easy to Maintain
The best organization system is one your family will actually use. Keep supplies nearby, use clear labels, and avoid creating too many categories. Once or twice a year, review stored artwork and update the collection.
If the system starts to feel difficult, simplify it. One display area, one storage folder, and one digital folder may be all you need. The purpose is to make creativity easier to enjoy, not to create more work.
With a small collection spot, regular sorting, and a thoughtful balance between display and storage, your child’s artwork can remain meaningful without taking over your home.